Alfa Romeo Zagato Register & Information Site
Everything you ever wanted to know about Zagato.... and more!
Bodywork
Alfa Romeo Junior Zagato Buyer's guide: Bodywork chapter
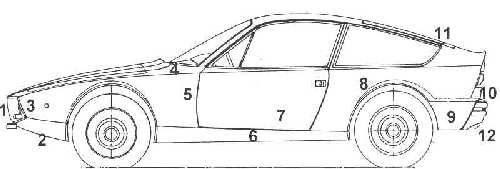
| No.: | Area to consider: | Expect to pay for the aftermarket part (approx.) |
| 1 | Perspex covers / Stainless steel frame | DM 600,- / DM 800,- (300,- € / 400,- €) |
| 2 | Front crossmember below radiator | DM 130,- (65,- €) |
| 3 | Panel for front lamps | DM 300,- (150,-€) |
| 4 | Gap between wipercover and front wings | --- |
| 5 | A-column | not available |
| 6 | Doorsills | DM 350,- (175,-€) |
| 7 | Doors | DM 600,- (per side for aluminum door skins) (300,- €) |
| 8 | Rear wing lip | Rear wing left DM 1.250,- (625,-€) / Rear wing right DM 1.300,- (650,- €) |
| 9 | Lower rear section of rear wing | |
| 10 | Rear panel | DM 1200,- (600,-€) |
| 11 | Rear hood | not available as aftermarket part |
| 12 | Rear bumper | DM 800,- to DM 1.000,- (400,- € to 500,- €) |
Have a look on the general appearance of the car first: Are the gaps between doors and sills or hoods and wings even?
Can you open the doors and hoods easily? Can you spot traces of an accident or parts formed out of filler?
You should start with the examination of the car at the front.
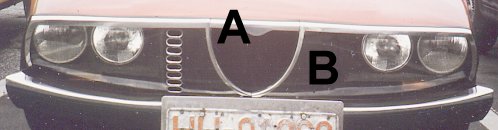
No.1: Perspex cover / Frame |
Are the perspex covers (B) in front of the lights? Do they show signs of cracks or scratches? The covers tend to break easily during rough parking maneuvers.
Is the stainless steel frame (A) evenly attached to the bodywork and has no major dents or scratches? What about moisture in the cavity behind the perspex covers? If you see trapped moisture the stainless steel frames are not properly aligned to the bodywork. |
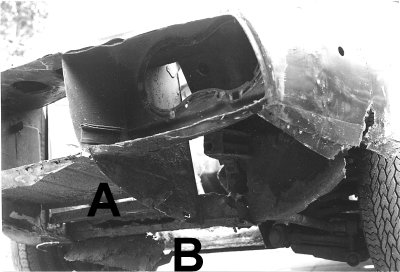
Have a look underneath the front section. The front crossmember below the radiator (No.2) is very prone to rust and can rot out badly. Mud trapped over the years in front of it can lead to heavy corrosion of the lower front panel.
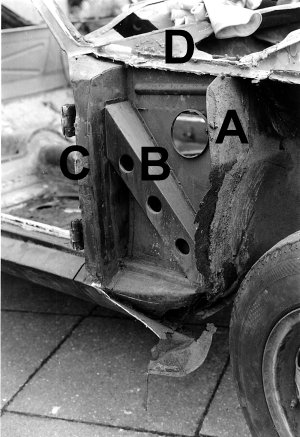
| Lower front panel already cut out. However some fragments hanging down can still be seen (B).
The front crossmember (A) below the radiator is heavily corroded. The front anti-roll bar is screwed with two brackets to the crossmember. |
No.2: Front crossmember |
No.2: Crossmember |
Different view on the same area after sandblasting.
The crossmember is on the driver's side not attached to the bodywork anymore (A). Panel (B) is the lower part of the frame holding the radiator. |
Have a look to the panel holding the front lamps (No.3) in their position. The panel is prone to rust from the inside. If you examine the front wheelarches check for rust along the upper welding edge in the engine bay (open the front hood). Turn the steering wheel into the far right or left position, bend your knees and check if the front and rear splash-plates are screwed into their position in the front wheel cavity. They are immensely important panels which shield the structure behind them. The shields to the front are having inspection holes (2 screws) to allow a look to the lamp-pots and the panel holding the lamps.
Make sure to check the cavity behind the rear splash-plate (ask the owner for permission to unscrew the plate). The cavity behind is an ideal trap for moisture leading to rust along the A-column (No.5) and to corrosion in the upper area of the front wings where they meet the wipercover (No.4).
| View from co-driver's side. The front wing has been cut out. The splash-plate (A) is relatively good preserved, only the outer edge normally covered by rubber is corroded.
Behind the plate you'll find the support (B) and the A-column (C). (D) is marking the upper area of the front wings where they meet the wipercover. |
No.5: A-column |
No.5: A-column |
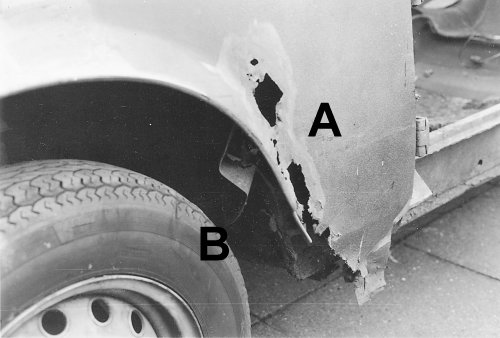
View to the wheelhouse from the driver's side: The splash-plate (B) was only partly there. The result: A rotten wing (A) and a heavily corroded cavity (not visible). |
Open the doors and check for rust along the lower edge of the door (No.7). Can you see oval holes without any obstruction like trapped leaves or dirt? The holes are drainage holes allowing water trapped in the doors to flow out.
Prepared prospective buyers are using a little permanent magnet to check for the door skin material - Aluminum or steel. There is no advantage of one material over the other: Steel tends to rust while Aluminum tends to corrode along the areas where the door skin meets the steel door-frame (watch out for white powder or residue!).
Now to the most crucial area - the doorsills (No.6). The doorsills are having a specific contour which is very difficult to repair with shiftmade panels. Carefully check the appearance of the sills and check if the drainage holes are blocked with rust.
Rear wings should be checked along the lips (No.8) i.e.the edge around the rear wheel and in the area of the lower rear section (No.9). Wings tend to rust in that area particularly well because there is a small cavity which can be seen (or the remains of it) when you have a look from underneath to the left and right. Once you lie underneath the car check the rearbumper (No.12) for dents and rust. Another area to examine from underneath is the boot pan where the panel meets the rear panel and the rearbumper (No.10). Often there is nothing much left, because three layers of steel meet there for their favourite game: Moisture trapping. If you want to inspect the same area from top you have to unscrew the stainless steel covers along the rearbumper.
An area which leads to confusion especially if you MOT the car is a gap between the chassis and the inner rear wheelarch along the radius of the rear tire. Bend your knees and try to feel along the inner wheelhouse towards the rear side windows. Normally there should be a rubber closing that gap. What you find very often is an open gap. If that is the case you can be almost sure that the wing and the inner wheelarch are perforated along the lower edge of the rear side window.
No.9/10: Rear wing and rear panel |
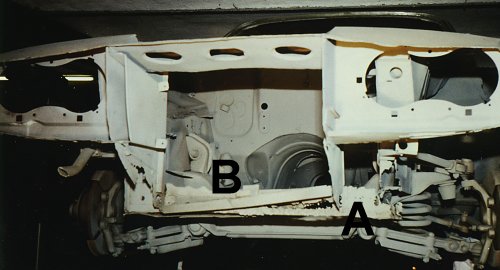
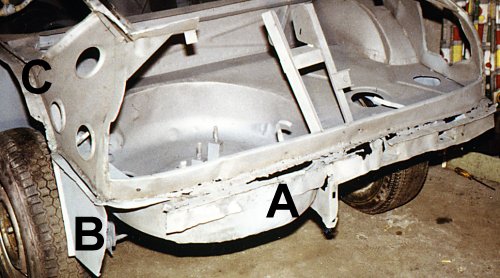
Structure of the rear section without rear panel and wings.
Boot pan, rear panel and rearbumper meet in area (A) - a genuine rot nest. Panel (B) and the rear wing are forming a cavity where dirt and moisture are trapped. Wing starts to rust from the inside. The inner rear wheelarch (C) is not welded together with the rear wing. This can lead to confusion when you MOT the car. |
The rear hood (No.11) tends to rust in the lower corners underneath the rubber seal for the rear window.
Alfa Romeo Zagato Register & Information Site
Find us on FaceBook:
No warranties, express or implied are given to any information provided herein, as this information is based on what we have found in literature, the internet and other public sources and submissions from previous and current owners.
By no means do we claim this information to be absolutely correct or complete.
We also don't mean to violate any privacy rights or copyrights.
Should any information or images violate such rights, please let us know and we will swiftly remove any infringing material.
If you feel that the information listed is incorrect or have something to add to the history of the vehicle, please let us know.
We can be contacted at jack@zagato-cars.com
Feel free to visit our sister websites:
www.ClassicJack.com www.TheF1Store.com www.MaranelloMerchandise.com www.RaceWinkel.nl www.RossiMerchandise.com www.MotoMerchandiseShop.com www.Macora.com www.ExperienceLeMans.com www.Zagato-Cars.com www.RalphSchumacher.com www.FerrariStuff.com www.PiccoloWorld.com www.GeoHam.com www.HouseOfTheTrident.com www.DellortoShop.com www.CarburateurWinkel.nl www.MaranelloLiterature.com www.CarburettorShop.com www.GunsonWinkel.nl www.GunsonShop.com www.TinToyShop.com www.RicambiCarburatori.com www.CarburetorCity.com www.CarburateurWinkel.be www.LePetitCarbu.fr